At Blautec we have conceived, designed and manufactured different models of hydraulic pool lifts or pool hoists that facilitate access to the pool for people with functional diversity or mobility problems.

Concretely, we put at your disposal four different models that adapt to all types of pools and depths: ACCESS B1, ACCESS B2, ACCESS B4 and the recently incorporated ACCESS B5

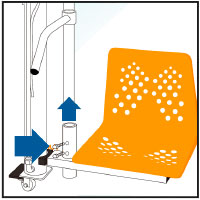
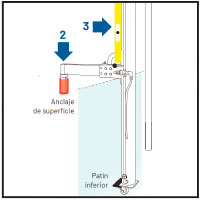
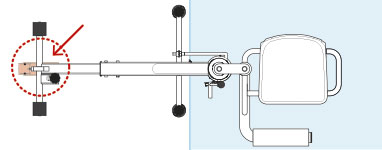
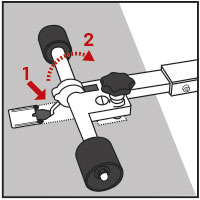
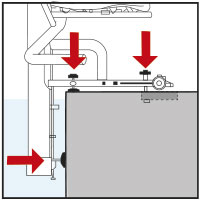
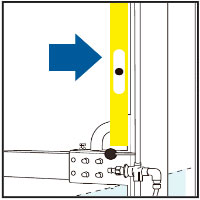
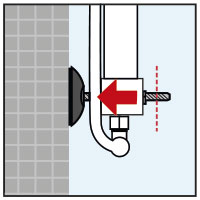
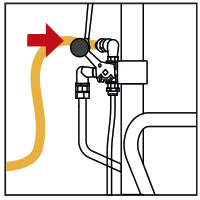
The installation of the hydraulic pool lifts ACCESS is remarkably simple and accessible to any maintenance technician.To set it up, it is only necessary to fix it on the surface, check the verticality of the shaft, adjust the position and height of the chair and connect it to a mains supply that offers a pressure of between 3.5 and 5 bar.

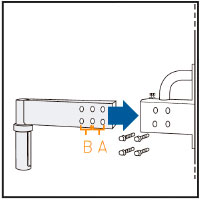
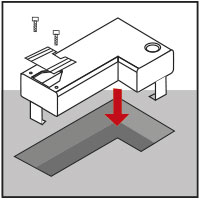
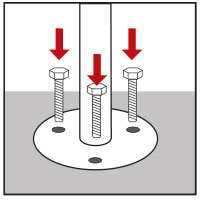
Each ACCESS pool lift model has a different installation method, but all are based on very simple basic principles. The models that are installed in a fixed way, must only screw its anchor leg to the ground, which guarantees a permanent stability. Other models of hydraulic lifts, which are portable and sharable, are installed by means of an anchor point recessed into the surface. This allows, with the installation of multiple anchors, the lift can be easily moved to different locations or pools, offering great flexibility and convenience.

How to install the new model of pool lifts with improved design and functionality ACCESS B5?

The installation of the new ACCESS B5 lift, with its improved design and functionality, is simple and quick, accessible to any maintenance technician. This model only requires a small anchor recessed into the surface. One of the great advantages of using this type of anchor is that it allows the lift to be shared between different pools. In addition, the lift can be removed and stored for long periods, such as in winter when the pool is closed, providing a practical and flexible solution.

Below we highlight its main assembly steps to demonstrate its simplicity:


The following are its main assembly steps to demonstrate its simplicity:

The following are its main assembly steps to demonstrate its simplicity:

The following are its main assembly steps to demonstrate its simplicity:

The following are its main assembly steps to demonstrate its simplicity:

The following are its main assembly steps to demonstrate its simplicity:

The following are its main assembly steps to demonstrate its simplicity.

Paso 1 de la instalación del anclaje del elevador de piscina Access B1

1. Drill the surface to make a 72 mm diameter hole. Insert the anchor and fill the hole with cement or chemical block.

2.

Paso 2 de la instalación del Access B2

2. Attach the anchor arm according to the chosen dimensions to the main structure of the pool lift.

2. Attach the anchor arm according to the chosen dimensions to the main structure of the pool lift.

3.

Paso 3 de la fijación del elevador Access b1 en la piscina

3. Screw together the user support arm assembly and the pre-assembled chair assembly by simply screwing in two screws.

3.
Paso 2 de la instalación del Access B2

4. Position the lift on the anchor. Check the verticality of the lift sleeve with the level. If necessary, correct the position of the lower skid to verticality and its support to the wall.

5.

How to install ACCESS B1 pool lift?

The ACCESS B1 fixing system is practical and very simple. With a single recessed anchor and three supports the lift offers maximum stability and safety to the user.

In addition its anchor arm is telescopic, a fact that allows it to adapt to all types of pool profiles pools.

This lift can be shared between several vessels in the same center with the simple installation of multiple anchor bases.

Esquema de instalación del elevador access b1
Paso 1 de la instalación del anclaje del elevador de piscina Access B1

1. Drill and embed the anchor into the surface.

2.

Paso 2 de la instalación del Access B2

2. Position the lift and attach the hook to the anchor. Lower the hook and lower the lift into the pool.

3.

Paso 3 de la fijación del elevador Access b1 en la piscina

3. Thread the fixing shaft and adjust the height of the adjustment feet. Check that the side support inside the pool is resting on the wall. Adjust if necessary.

Paso 2 de la instalación del Access B2

4. Check the verticality of the shaft. Finally, connect the mains water supply to the lift to feed the circuit.

How to install the ACCESS B2 pool chair for People with reduced mobility?

The ACCESS B2 model is quite similar to the ACCESS B1. Its main difference is the anchoring method. In the case of ACCESS B2 pool lift model, no recessed anchoring is necessary. For its installation we only need to screw its base to the ground.

The ACCESS B2 model is quite similar to the ACCESS B1.

1. Present the lift in the pool, adjust the telescopic anchoring arm of the lift to the desired size and adjust the two outer ball joints to compensate for the possible inclination of the beach.

2.

2. Drill the pavement and place the three metal plugs of the leg or anchor base of the lift.

3.

3. Thread the fixing shaft and adjust the height of the adjustment feet. Check that the side support inside the pool is resting on the wall. Adjust if necessary.

4. Check the verticality of the shaft, adjust its adjustment feet if necessary. To finish, place the mains water inlet to the lift to feed the circuit.

How to install the hydraulic lift ACCESS B4 and B4XL?

The fixing system of the pool lift is very simple. It only requires three plugs screwed to the pavement and three supports that have threaded to adapt to the pool.

Paso 1 Instalación de modelos Access fijos

1. Present the lift, mark and drill the 3 holes in the anchor arm plate (measuring 20 cm).

2.

Paso 2 Instalación de modelos Access fijos

2. Check the position of the lower lateral ball joint and adjust it until full verticality of the lift shaft is achieved.

Paso 3 de Instalación de modelos Access fijos

3. Fit the water inlet to feed the circuit.

4.

Product added to compare.

We use our own and third-party cookies for analytical purposes and to show you personalised advertising based on a profile of your browsing habits (e.g. pages visited). For more information, please see our Cookie Policy